
trackman
Five Tips to Stop Swinging Across
20/12/18 14:56
If you struggle with slices, pulls, short clubs that fly too high and long clubs that fly too low or a general lack of distance there is a good chance you suffer from this fault. These are shots that for a right handed golfer fly to the left and stay to the left left or shots that curve excessively to the right. Swinging across the ball is commonly known as swinging from out/in. For right handed players, it means your club head is moving to the left of the target as you strike the ball.

Here are 5 tips you can follow to correct this issue:
1. Weight location
Your weight should be forwards as you strike the ball. Often golfers will have too much weight back at address, move it back during the backswing, during the follow though or a combination of all these. Your hips must shift forwards during your downswing. It is common knowledge that the hips must turn but there must also be an element of lateral slide. If the hips turn but don’t slide, your club will begin to swing across the ball.
2. Handle location
When the handle leans away from the target at impact the club head will swing across the ball. You do not want to deliberately attempt to roll the wrists through impact. Instead focus on keeping the distance between your elbows constant throughout your swing as this will enable you to hit the ball with your handle leaning towards the target
3. Hand Path
The hands should work backwards, upwards and inwards during the course of the backswing. Golfers who swing across the ball often don’t move the hands sufficiently inwards and instead lift the arms off the ribcage in an upward motion.
4. Lead Knee Action
Make sure you don’t straighten your lead knee too soon during your downswing as this throws the hips back and spins them open. Straightening the knee is a power move but should not start to happen until the club shaft is parallel to the ground during the backswing. The lead knee should not be straight until your arms are parallel to the ground during the follow through.
5. Ball Position
Move the ball slightly back in your stance so you make contact with the ball earlier on the club head’s arc through the ball
Play well and I look forward to your feedback when you try these 5 tips.
Elite Player Benchmarking with Trackman
12/08/17 13:14
Elite Player Benchmarking & Practice with Trackman
One of the benefits of training with Trackman is the feedback both the player and coach receive with regards to the ball flight and club data. Being able to demonstrate progress and the effect of different moves on the numbers is invaluable for the coach. Being able to create a feel for the swing when a certain set of numbers is created is invaluable for the player as having quality feedback invariably speeds up the learning process. Another benefit is the ability to create meaningful practice scenarios via the Trackman Test Centre and to use these to benchmark players’ ability. In this article I will share two of the exercises I use with elite golfers but first let’s look at some of the aspects that must be present in order to make the most of your practice sessions.
How to make your practice count?
It is important to practice with a purpose and for there to be a consequence to the shots you hit while training. There are countless examples of golfers who spend hour after hour on the driving range hitting shot after shot and who in the long run achieve very little other than perhaps the ability to hit nice looking shots on the driving range. This is largely due to the fact they are hitting golf shots out of context as there is no reward or penalty for good and bad shots, there is always the opportunity to hit one more shot. Driving ranges also tend to be fairly wide making it difficult to evaluate the true worth of each shot. Perhaps the only shot that has real consequence when people practice on the range is the one with the last ball in the range basket. If you hit that shot badly the session ends on a disappointing note and if you hit it well you go home thinking all is well and your game is in shape. In fact, I often see golfers get around this problem by actually stopping their practice sessions a few balls shy of the last ball in the basket. A good shot is hit, there are three balls left in the basket and the golfer doesn’t bother to hit the last three as he wants to finish with a good one. Try not to be guilty of this as sadly, this is not how it works when you are out on the golf course, there are no second serves and every shot counts. You want to try and replicate the pressure you feel on the first tee on all the shots you hit during your practice. It is important to try and make practice simulate the real game as closely as possible, perhaps even at times making it harder than the game itself. It is also important for you to be able to quantify your practice in terms of your performance and not simply in terms of the time spent hitting balls. Practice with all these things in mind and you will maximise your chances of improving.
- MAKE IT MEASURABLE (OBJECTIVE NOT SUBJECTIVE) - MAKE IT REAL (CONSEQUENCE AND PRESSURE) - MAKE IT HARD
Test Centre assessments for elite players
As I said earlier, there are many benefits to Trackman, not simply to do with the quality of the data but to do with the actual method of training and the ability to monitor results. No doubt most people who regularly work with a Trackman unit have at some stage carried out a combine test. The Combine is a standardised test asking golfers to hit 60 shots at 10 different targets and gives all shots a score out of 100. Because of the sheer number of people who have taken the test it allows comparisons to be made between golfers of different abilities. If you’ve ever taken this test you will know the pressure that is created by knowing that your score will be posted on a worldwide leaderboard for your friends and
everyone to see. The Test feature on the software also allows specific tests to be designed.
The following are two tests/games I carry out with elite and aspiring players 1. Beat the Pro
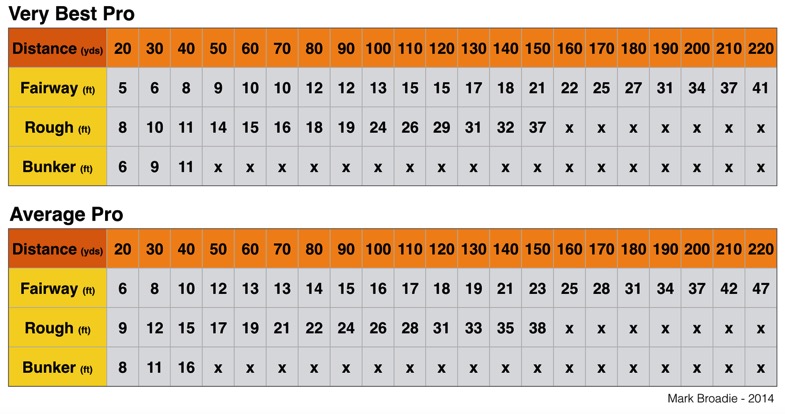
This first test is based on the information gathered by shotlink on the PGA Tour and the work done by Mark Broadie that he discusses in detail in his book “Every Shot Counts”. In the book, he lists the average proximity to the hole from a number of distances and a number of lies for both the very best pro and the average pro on the PGA Tour. I have collated this data in the table below.
A good time to carry out this test is when you have established a particular distance that you wish to improve. This could for example be following a Combine Test where you have determined that your weakest distances are 90 yards and 180 yards or following a round of golf where you hit some errant shots that you didn’t like from specific distances.
The object of the game is to hit 9 shots from your selected distance and establish whether you can beat the average PGA Tour Pro or even the very best PGA Tour Pro. You receive 1 point for beating the average pro and 2 points if you beat the best pro. This means that the game is scored out of 18 points in total. You must change the target every three shots in order for the shots not to become too repetitive and simulate golf as closely as possible. As an example, you have decided that 140 yards is a weakness. Create a Trackman test with 9 shots at 140 yards. Select a target and hit the first three shots. If your ball finishes between 21 and 19 feet from the pin you receive one point and if it finishes 18 feet or closer to the pin you receive 2 points. After the first three shots change the target and repeat. Tally up the score at the end out of 18 to establish your result for that session.
You are only allowed to carry out the test at each distance once per practice session. Remember there are no second serves in golf and you want to carry out the test in a pressured environment. If you could simply take it again after an unsatisfactory result that would be too easy. There is nothing better than simulating pressure if you want to perform well under pressure when you’re competing. I would urge you to keep a record of your results and to write them down in a little notebook, there is nothing quite like putting pen to paper. Notice you can also carry out this test from the rough and to benchmark yourself on bunker shots up to 40 yards.
2. Race to Number One
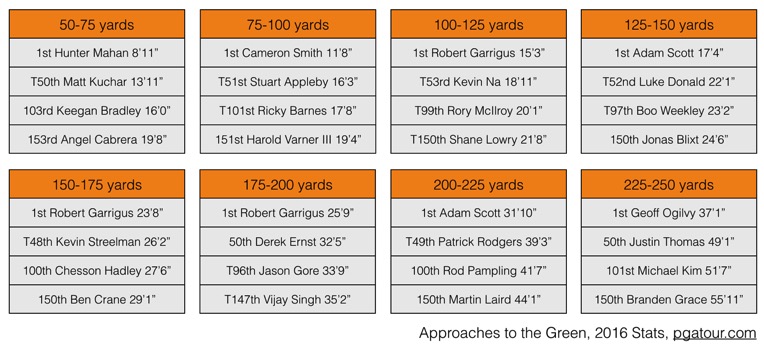
This second test is based on the info gathered by Shot link on the PGA Tour and the stats that are kept on pgatour.com in the accuracy from fairway section. These stats list the average proximity to the hole for all PGA Tour players from between set distances. In 2016 for example, from 50-75 yards Hunter Mahan lead the tour by finishing just 8’11” from the hole when playing shots from the fairway from that range. This is a test you can also carry out with aspiring elite players in order to establish which areas might need improvement and the gap that must be filled between their performance and that of a PGA Tour player.
The yardages the PGA Tour keep statistics for are: 50-75 yards / 75-100 yards / 100-125 yards / 125-150 yards / 150-175 yards / 175-200 yards / 200-225 yards / 225-250 yards / 250-275 yards
The Tour also keeps statistics for wider windows such as 50-125 yards but I don’t tend to use these as the data could be biased if you were doing a Random Test depending on whether Trackman gave you more shorter or more longer shots.
Carrying out this test involves hitting 10 shots and establishing your average distance from the pin from the range you have selected. Let’s set it up as though you were working on 125 to 150 yards. Create a Random Test on Trackman setting the lower distance as 125 and the upper distance as 150 yards, select 10 shots. Select your target and hit two shots at the required distance towards that target. Every couple of shots you must aim the Trackman at a different target. Carry on until you have hit all 10 shots. Once you have finished check the Report and see what your average distance from the pin is and compare it to the players on the PGA Tour.
The following is a test report after conducting a 125-150 yards test. This player’s result is circled in red and indicates, using the “Approaches to the Green” table below, he is 1’1” outside 150th place on the PGA Tour from that range meaning there is some work to be done in this area.

If you visit the PGA Tour website you will notice that average distances are also worked out for shots hit from the rough. This means that just like the first test, you could also carry out this second test from the rough. If you want to further increase the difficulty of this test you can play shots with the ball resting on uneven lies (above, below, uphill, downhill), just make sure you don’t pay too much attention to the club data when you do this.
It is important to note that Trackman’s distance from the pin measurement is based on where the ball landed using carry flat. It’s very much like throwing darts, Trackman is asking can you land it as close as possible to your target? The statistics from the Tour, however, are taken from shots hit on the golf course and this means that the players have to take into account how the ball is going to respond when it lands. It also means that at times the golfers may not be aiming straight at the flag. Nonetheless, these two exercises provide you with some very real targets to beat and measure yourself against.
Remember, it is important for you to simulate real golf as closely as possible when practicing. You need to feel a sense of pressure otherwise you will not be able to replicate your new skills when you are out on the golf course. Every shot needs to have a purpose and every shot must count. When possible, your practice should be harder than the real thing. These two tests will allow you to gauge your current ability and help you and your coach structure your practice.
Please let me know how you get on, I look forward to hearing your results.
One of the benefits of training with Trackman is the feedback both the player and coach receive with regards to the ball flight and club data. Being able to demonstrate progress and the effect of different moves on the numbers is invaluable for the coach. Being able to create a feel for the swing when a certain set of numbers is created is invaluable for the player as having quality feedback invariably speeds up the learning process. Another benefit is the ability to create meaningful practice scenarios via the Trackman Test Centre and to use these to benchmark players’ ability. In this article I will share two of the exercises I use with elite golfers but first let’s look at some of the aspects that must be present in order to make the most of your practice sessions.
How to make your practice count?
It is important to practice with a purpose and for there to be a consequence to the shots you hit while training. There are countless examples of golfers who spend hour after hour on the driving range hitting shot after shot and who in the long run achieve very little other than perhaps the ability to hit nice looking shots on the driving range. This is largely due to the fact they are hitting golf shots out of context as there is no reward or penalty for good and bad shots, there is always the opportunity to hit one more shot. Driving ranges also tend to be fairly wide making it difficult to evaluate the true worth of each shot. Perhaps the only shot that has real consequence when people practice on the range is the one with the last ball in the range basket. If you hit that shot badly the session ends on a disappointing note and if you hit it well you go home thinking all is well and your game is in shape. In fact, I often see golfers get around this problem by actually stopping their practice sessions a few balls shy of the last ball in the basket. A good shot is hit, there are three balls left in the basket and the golfer doesn’t bother to hit the last three as he wants to finish with a good one. Try not to be guilty of this as sadly, this is not how it works when you are out on the golf course, there are no second serves and every shot counts. You want to try and replicate the pressure you feel on the first tee on all the shots you hit during your practice. It is important to try and make practice simulate the real game as closely as possible, perhaps even at times making it harder than the game itself. It is also important for you to be able to quantify your practice in terms of your performance and not simply in terms of the time spent hitting balls. Practice with all these things in mind and you will maximise your chances of improving.
- MAKE IT MEASURABLE (OBJECTIVE NOT SUBJECTIVE) - MAKE IT REAL (CONSEQUENCE AND PRESSURE) - MAKE IT HARD
Test Centre assessments for elite players
As I said earlier, there are many benefits to Trackman, not simply to do with the quality of the data but to do with the actual method of training and the ability to monitor results. No doubt most people who regularly work with a Trackman unit have at some stage carried out a combine test. The Combine is a standardised test asking golfers to hit 60 shots at 10 different targets and gives all shots a score out of 100. Because of the sheer number of people who have taken the test it allows comparisons to be made between golfers of different abilities. If you’ve ever taken this test you will know the pressure that is created by knowing that your score will be posted on a worldwide leaderboard for your friends and
everyone to see. The Test feature on the software also allows specific tests to be designed.
The following are two tests/games I carry out with elite and aspiring players 1. Beat the Pro
This first test is based on the information gathered by shotlink on the PGA Tour and the work done by Mark Broadie that he discusses in detail in his book “Every Shot Counts”. In the book, he lists the average proximity to the hole from a number of distances and a number of lies for both the very best pro and the average pro on the PGA Tour. I have collated this data in the table below.
A good time to carry out this test is when you have established a particular distance that you wish to improve. This could for example be following a Combine Test where you have determined that your weakest distances are 90 yards and 180 yards or following a round of golf where you hit some errant shots that you didn’t like from specific distances.
The object of the game is to hit 9 shots from your selected distance and establish whether you can beat the average PGA Tour Pro or even the very best PGA Tour Pro. You receive 1 point for beating the average pro and 2 points if you beat the best pro. This means that the game is scored out of 18 points in total. You must change the target every three shots in order for the shots not to become too repetitive and simulate golf as closely as possible. As an example, you have decided that 140 yards is a weakness. Create a Trackman test with 9 shots at 140 yards. Select a target and hit the first three shots. If your ball finishes between 21 and 19 feet from the pin you receive one point and if it finishes 18 feet or closer to the pin you receive 2 points. After the first three shots change the target and repeat. Tally up the score at the end out of 18 to establish your result for that session.
You are only allowed to carry out the test at each distance once per practice session. Remember there are no second serves in golf and you want to carry out the test in a pressured environment. If you could simply take it again after an unsatisfactory result that would be too easy. There is nothing better than simulating pressure if you want to perform well under pressure when you’re competing. I would urge you to keep a record of your results and to write them down in a little notebook, there is nothing quite like putting pen to paper. Notice you can also carry out this test from the rough and to benchmark yourself on bunker shots up to 40 yards.
2. Race to Number One
This second test is based on the info gathered by Shot link on the PGA Tour and the stats that are kept on pgatour.com in the accuracy from fairway section. These stats list the average proximity to the hole for all PGA Tour players from between set distances. In 2016 for example, from 50-75 yards Hunter Mahan lead the tour by finishing just 8’11” from the hole when playing shots from the fairway from that range. This is a test you can also carry out with aspiring elite players in order to establish which areas might need improvement and the gap that must be filled between their performance and that of a PGA Tour player.
The yardages the PGA Tour keep statistics for are: 50-75 yards / 75-100 yards / 100-125 yards / 125-150 yards / 150-175 yards / 175-200 yards / 200-225 yards / 225-250 yards / 250-275 yards
The Tour also keeps statistics for wider windows such as 50-125 yards but I don’t tend to use these as the data could be biased if you were doing a Random Test depending on whether Trackman gave you more shorter or more longer shots.
Carrying out this test involves hitting 10 shots and establishing your average distance from the pin from the range you have selected. Let’s set it up as though you were working on 125 to 150 yards. Create a Random Test on Trackman setting the lower distance as 125 and the upper distance as 150 yards, select 10 shots. Select your target and hit two shots at the required distance towards that target. Every couple of shots you must aim the Trackman at a different target. Carry on until you have hit all 10 shots. Once you have finished check the Report and see what your average distance from the pin is and compare it to the players on the PGA Tour.
The following is a test report after conducting a 125-150 yards test. This player’s result is circled in red and indicates, using the “Approaches to the Green” table below, he is 1’1” outside 150th place on the PGA Tour from that range meaning there is some work to be done in this area.
If you visit the PGA Tour website you will notice that average distances are also worked out for shots hit from the rough. This means that just like the first test, you could also carry out this second test from the rough. If you want to further increase the difficulty of this test you can play shots with the ball resting on uneven lies (above, below, uphill, downhill), just make sure you don’t pay too much attention to the club data when you do this.
It is important to note that Trackman’s distance from the pin measurement is based on where the ball landed using carry flat. It’s very much like throwing darts, Trackman is asking can you land it as close as possible to your target? The statistics from the Tour, however, are taken from shots hit on the golf course and this means that the players have to take into account how the ball is going to respond when it lands. It also means that at times the golfers may not be aiming straight at the flag. Nonetheless, these two exercises provide you with some very real targets to beat and measure yourself against.
Remember, it is important for you to simulate real golf as closely as possible when practicing. You need to feel a sense of pressure otherwise you will not be able to replicate your new skills when you are out on the golf course. Every shot needs to have a purpose and every shot must count. When possible, your practice should be harder than the real thing. These two tests will allow you to gauge your current ability and help you and your coach structure your practice.
Please let me know how you get on, I look forward to hearing your results.
The Low Point, DIfferent Skill Levels and its Mastery
12/08/17 12:11
THE LOW POINT, DIFFERENT SKILL LEVELS AND ITS MASTERY Low Point - Definition
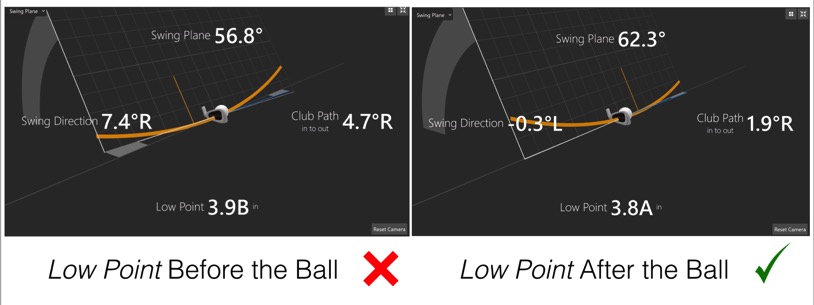
Trackman measures a number called Low Point and learning to master the Low Point is an essential skill for golfers who want to make good contact with the ball and maximise their distance. The technical definition is that the Low Point represents the distance from the club head’s geometric centre to the lowest point on the swing arc at the time of maximum compression. Impact can occur either before the Low Point or after the Low Point has been reached by the club head. There is a strong correlation between Angle of Attack and Low Point as when the golfer hits down on the golf ball the Low Point is situated after the golf ball and when the golfer hits up on the golf ball the Low Point is situated before the golf ball. The illustrations below help to provide a clear understanding of the concept.
Low Point Illustration
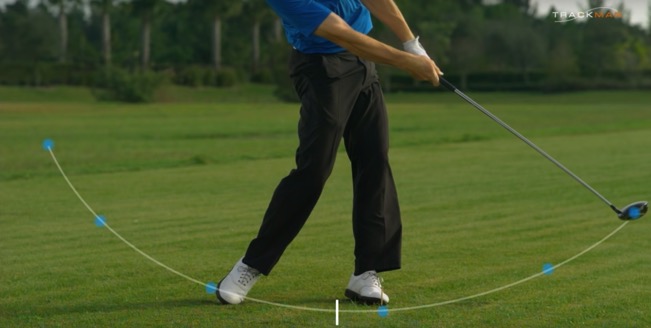
The following picture depicts the arc the club head travels from approximately knee height on the downswing to knee height on the through swing with the bottom of the arc depicted here by a vertical white line. The lowest point on this arc is what is termed the Low Point. The ball is struck either before the club head reaches the low point with a descending angle of attack or after the club head reaches the low point with an upwards angle of attack.
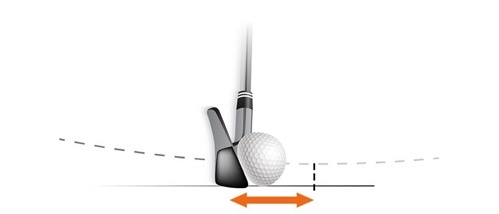
In the picture below, you can see an example of the Low Point situated just after the golf ball as the club head travels downwards through impact. The vertical dotted line indicates the position of the Low Point and the orange arrow indicates the distance before the Low Point.
What is the correct Low Point
When the balls rests on the turf, it is necessary for golfers to hit down on the ball. This is because there is a need to strike the golf ball first and then the ground. In order to understand this think about the position of the divot after a well struck shot. It is always located on the target side of the golf ball. This signifies that the golfer’s club head is moving downwards through impact, it is a negative attack angle and a Low Point after the golf ball.
With a driver in hand, it is possible for the Low Point to be situated before the golf ball. The average angle of attack with a driver on the PGA Tour, as measured by Trackman, is -1.3 ̊ which implies the Low Point is after the ball. However, the average angle of attack on the LPGA Tour is +3 ̊, this means the Low Point is situated before the ball and the club head is travelling upwards through impact. Whatever the reasons behind this difference, be it technique, physical make-up or intention, this upward hit and Low Point position before the ball leads to a gain in potential distance. As an example, a golfer who swings at 90mph with a -5 ̊ angle of attack and makes a change that allows them to hit with a +5 ̊ angle of attack, could gain almost 30 yards in total distance. Golfers who reach the bottom of their swing arc before the ball and have their Low Point before the ball will need to consider the effect this has on the swing path as, all other things equal, this will tend to shift the club path to the left for a right hander. These golfers may therefore want to consider rotating their swing direction further to the right, or to the left for left handers, in order to compensate for this.
If we compare the average attack angle with a 7 iron on the PGA Tour with the same on the LPGA Tour, we notice that though both groups have the Low Point situated after the golf ball the women golfers don’t have the Low Point quite as far after the ball as the men. In fact, they hit down -2.3 ̊ with a 7 iron compared to -4.3 ̊ for the male golfers. The point to remember here is that though the Low Point must occur after the golf ball, there is in fact a reasonably wide range demonstrated by the world’s best players. Golfers with slower swing speeds may benefit by not having the Low Point situated too far after the golf ball as long as it remains after the golf ball.
Low Point Patterns in Golfers of Different Abilities
It is important to note that the following are general patterns that I see day in and day out on the lesson tee. Of course, no two golfers are the same and each have their own individual swing tendencies. On a case by case basis, you can find golfers of different abilities who demonstrate every possible variable.
Pattern with a short to mid-iron from the fairway
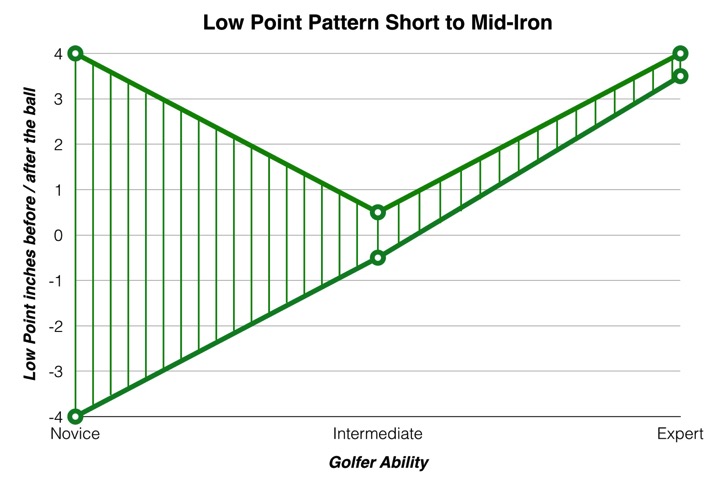
Novice Golfers Type 1 The Low Point is usually situated before the golf ball and there is a wide spread between shots. This means the club head reaches the bottom of its arc before impact and thus the club head is travelling upwards as the ball is struck. The consequence of this is that these golfers will tend to hit a number of fat and thin shots. They will generally hit thin shots when the arms flex too fast through impact, fat shots when the arms don’t flex fast enough and good shots when the arms flex just the right amount. This is a particularly chaotic procedure and makes it difficult to find any consistency in ball striking. These golfers will exhibit a flip through impact with a bending of the lead wrist as the club head overtakes the hands. These golfers are more comfortable when their ball rests sitting up on fluffy fairways or when the ball is teed up. The Dynamic loft will also tend to be too high for these golfers as they “add” loft to their club resulting in shots which reach their peak height too soon and lose distance as a consequence. Type 2 The Low Point is usually situated after the golf ball and there is a wide spread between shots. This is usually due to the fact these golfers have a severe over the top move during their downswings, the predominant trajectories are pulls and slices. These golfers will hit a number of fat and thin shots and exhibit the same tendencies through impact with the arms flexing and the club head overtaking the hands. As the club gets longer, the Low Point tends to move forwards rather than backwards as it should. These golfers normally hit their short clubs with too much loft and their longer clubs with not enough loft.
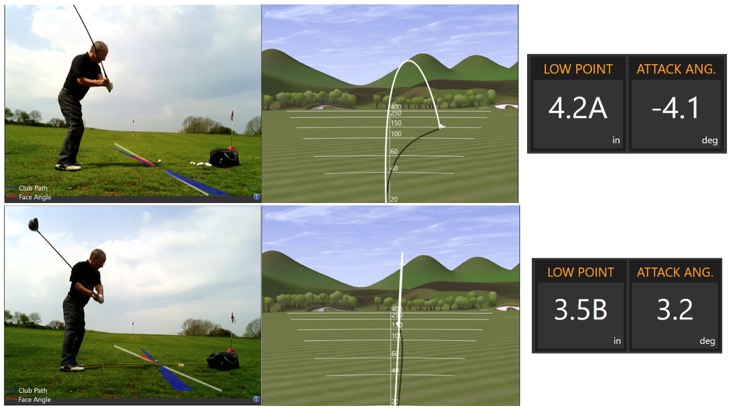
The following is an example of a Type 2 golfer changing his motion so that it is no longer over the top and shows the effect this move had on the Low Point of his swing:
Intermediate Golfers
For these golfers the Low Point is often situated at the golf ball. This means the club head reaches the bottom of its arc during impact and thus the club head is travelling neither downwards or upwards. The Low Point varies from shot to shot but not as much as for novice golfers. These golfers will exhibit all the traits of the novice golfers but to a lesser degree. There will be some fat and thin shots and some loss of potential distance due to the loft delivered at impact even though the strikes are more solid and consistent.
Expert Golfers
In this instance the Low Point is situated after the golf ball and varies very little from shot to shot. This means the club head reaches the bottom of its arc after contact with the golf ball, as the club head is travelling downwards through impact. These players take their divots on the target side of their golf ball and their ball striking is solid with very few or no fat and thin shots. These golfers are comfortable hitting shots off tight fairways and even relish the opportunity of doing so. They exhibit a forward leaning shaft at impact with the club head trailing the hands. These players “reduce” the loft on their club, while not hitting down excessively, such that the golf ball is better compressed for golf shots that travel further.
Low Point Exercises
Knowledge of the Task at Hand
Make sure you have an understanding of the task. In order to become an accomplished ball striker when the ball rests on the ground, you must learn to hit the ball before the ground. This necessitates a descending angle of attack and a Low Point on the target side of the golf ball. On your next few shots, try and picture the Low Point of your swing on the target side of the golf ball rather than at the golf ball, this will help you create the forward leaning shaft and weight forwards configuration that is necessary to strike the ball well.
Punch Shots Hold the Finish Drill
First, mark a line on the ground using spray paint or make an indent in the ground by stepping on a dowel. Second, make some half swing practice swings where your club head makes a shallow dollar sized divot on the ground, starting on the line but not before it. To give yourself the best chance of accomplishing this, check that you finish with your arms straight, your hips forwards and your handle forwards. Second, introduce a golf ball and hit some punch shots following the same procedure. The ball should fly low and with a draw bias. Pay specific attention to your finish as it is a stationary position, thus making it possible to compare the motion you do from one shot to the next. For example you can check exactly how straight your arms are after each shot and make adjustments if needed. A good finish indicates many of the things that happened during the swing but were too fast to see were done well.
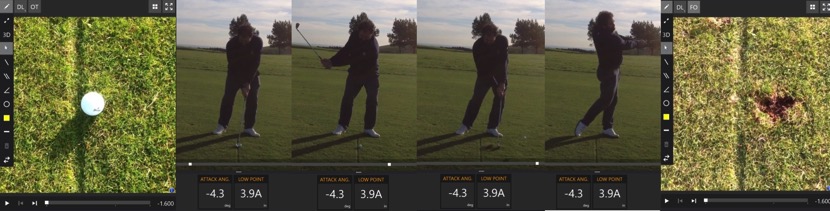
Notice in the sequence of pictures below, how clearly you can see the line on the ground as marked by the dowel. You can also observe how the hips and the shaft are forwards through impact which makes it possible to take the divot on the target side of the golf ball thus making the Low Point after the ball.
The Driver
As we have seen, having the Low Point situated slightly before the golf ball can be beneficial for hitting the ball longer distances with the driver. However, in my experience, the average golfer doesn’t have a strong enough “picture” in mind of what they are trying to achieve at impact. Quite often the Low Point is not situated sufficiently forwards because the golfer thinks he needs to assist the ball up into the air rather than let the club do the work. This is when golfers start to hang back, rather than transferring their weight forwards, and flip the wrists through impact while their arms flex, thus leading to all kinds of problems. More often than not, these moves have the opposite effect than that which is desired on the location of the Low Point. I often ask golfers what they think impact should look like and I am frequently told that it should mirror setup as closely as possible, this is not the case unless you have pre-set yourself into impact alignments before you start the swing. If you are going to work on having the Low Point slightly before the ball with a driver and an upwards angle of attack, make sure you don’t do it at the detriment of your basic impact alignments. Please ensure you achieve mastery of your Low Point by transferring your weight forwards via the motion of the hips going forwards, the body extending with the belt level rising and making an effort to keep the arms straight while the head remains centred and your inclination to the ground remaining constant. Remember also there are many things you can do to increase driver distance and altering your low point may or may not be the best option for you.
A Caveat
If the Low Point number given by Trackman indicates all is well but you are still struggling with fat and thin shots, be aware the distance between the lead shoulder and the golf ball must match the distance between the lead shoulder and the club head during impact. When this is not the case the golf ball still cannot be struck well.
Trackman measures a number called Low Point and learning to master the Low Point is an essential skill for golfers who want to make good contact with the ball and maximise their distance. The technical definition is that the Low Point represents the distance from the club head’s geometric centre to the lowest point on the swing arc at the time of maximum compression. Impact can occur either before the Low Point or after the Low Point has been reached by the club head. There is a strong correlation between Angle of Attack and Low Point as when the golfer hits down on the golf ball the Low Point is situated after the golf ball and when the golfer hits up on the golf ball the Low Point is situated before the golf ball. The illustrations below help to provide a clear understanding of the concept.
Low Point Illustration
The following picture depicts the arc the club head travels from approximately knee height on the downswing to knee height on the through swing with the bottom of the arc depicted here by a vertical white line. The lowest point on this arc is what is termed the Low Point. The ball is struck either before the club head reaches the low point with a descending angle of attack or after the club head reaches the low point with an upwards angle of attack.
In the picture below, you can see an example of the Low Point situated just after the golf ball as the club head travels downwards through impact. The vertical dotted line indicates the position of the Low Point and the orange arrow indicates the distance before the Low Point.
What is the correct Low Point
When the balls rests on the turf, it is necessary for golfers to hit down on the ball. This is because there is a need to strike the golf ball first and then the ground. In order to understand this think about the position of the divot after a well struck shot. It is always located on the target side of the golf ball. This signifies that the golfer’s club head is moving downwards through impact, it is a negative attack angle and a Low Point after the golf ball.
With a driver in hand, it is possible for the Low Point to be situated before the golf ball. The average angle of attack with a driver on the PGA Tour, as measured by Trackman, is -1.3 ̊ which implies the Low Point is after the ball. However, the average angle of attack on the LPGA Tour is +3 ̊, this means the Low Point is situated before the ball and the club head is travelling upwards through impact. Whatever the reasons behind this difference, be it technique, physical make-up or intention, this upward hit and Low Point position before the ball leads to a gain in potential distance. As an example, a golfer who swings at 90mph with a -5 ̊ angle of attack and makes a change that allows them to hit with a +5 ̊ angle of attack, could gain almost 30 yards in total distance. Golfers who reach the bottom of their swing arc before the ball and have their Low Point before the ball will need to consider the effect this has on the swing path as, all other things equal, this will tend to shift the club path to the left for a right hander. These golfers may therefore want to consider rotating their swing direction further to the right, or to the left for left handers, in order to compensate for this.
If we compare the average attack angle with a 7 iron on the PGA Tour with the same on the LPGA Tour, we notice that though both groups have the Low Point situated after the golf ball the women golfers don’t have the Low Point quite as far after the ball as the men. In fact, they hit down -2.3 ̊ with a 7 iron compared to -4.3 ̊ for the male golfers. The point to remember here is that though the Low Point must occur after the golf ball, there is in fact a reasonably wide range demonstrated by the world’s best players. Golfers with slower swing speeds may benefit by not having the Low Point situated too far after the golf ball as long as it remains after the golf ball.
Low Point Patterns in Golfers of Different Abilities
It is important to note that the following are general patterns that I see day in and day out on the lesson tee. Of course, no two golfers are the same and each have their own individual swing tendencies. On a case by case basis, you can find golfers of different abilities who demonstrate every possible variable.
Pattern with a short to mid-iron from the fairway
Novice Golfers Type 1 The Low Point is usually situated before the golf ball and there is a wide spread between shots. This means the club head reaches the bottom of its arc before impact and thus the club head is travelling upwards as the ball is struck. The consequence of this is that these golfers will tend to hit a number of fat and thin shots. They will generally hit thin shots when the arms flex too fast through impact, fat shots when the arms don’t flex fast enough and good shots when the arms flex just the right amount. This is a particularly chaotic procedure and makes it difficult to find any consistency in ball striking. These golfers will exhibit a flip through impact with a bending of the lead wrist as the club head overtakes the hands. These golfers are more comfortable when their ball rests sitting up on fluffy fairways or when the ball is teed up. The Dynamic loft will also tend to be too high for these golfers as they “add” loft to their club resulting in shots which reach their peak height too soon and lose distance as a consequence. Type 2 The Low Point is usually situated after the golf ball and there is a wide spread between shots. This is usually due to the fact these golfers have a severe over the top move during their downswings, the predominant trajectories are pulls and slices. These golfers will hit a number of fat and thin shots and exhibit the same tendencies through impact with the arms flexing and the club head overtaking the hands. As the club gets longer, the Low Point tends to move forwards rather than backwards as it should. These golfers normally hit their short clubs with too much loft and their longer clubs with not enough loft.
The following is an example of a Type 2 golfer changing his motion so that it is no longer over the top and shows the effect this move had on the Low Point of his swing:
Intermediate Golfers
For these golfers the Low Point is often situated at the golf ball. This means the club head reaches the bottom of its arc during impact and thus the club head is travelling neither downwards or upwards. The Low Point varies from shot to shot but not as much as for novice golfers. These golfers will exhibit all the traits of the novice golfers but to a lesser degree. There will be some fat and thin shots and some loss of potential distance due to the loft delivered at impact even though the strikes are more solid and consistent.
Expert Golfers
In this instance the Low Point is situated after the golf ball and varies very little from shot to shot. This means the club head reaches the bottom of its arc after contact with the golf ball, as the club head is travelling downwards through impact. These players take their divots on the target side of their golf ball and their ball striking is solid with very few or no fat and thin shots. These golfers are comfortable hitting shots off tight fairways and even relish the opportunity of doing so. They exhibit a forward leaning shaft at impact with the club head trailing the hands. These players “reduce” the loft on their club, while not hitting down excessively, such that the golf ball is better compressed for golf shots that travel further.
Low Point Exercises
Knowledge of the Task at Hand
Make sure you have an understanding of the task. In order to become an accomplished ball striker when the ball rests on the ground, you must learn to hit the ball before the ground. This necessitates a descending angle of attack and a Low Point on the target side of the golf ball. On your next few shots, try and picture the Low Point of your swing on the target side of the golf ball rather than at the golf ball, this will help you create the forward leaning shaft and weight forwards configuration that is necessary to strike the ball well.
Punch Shots Hold the Finish Drill
First, mark a line on the ground using spray paint or make an indent in the ground by stepping on a dowel. Second, make some half swing practice swings where your club head makes a shallow dollar sized divot on the ground, starting on the line but not before it. To give yourself the best chance of accomplishing this, check that you finish with your arms straight, your hips forwards and your handle forwards. Second, introduce a golf ball and hit some punch shots following the same procedure. The ball should fly low and with a draw bias. Pay specific attention to your finish as it is a stationary position, thus making it possible to compare the motion you do from one shot to the next. For example you can check exactly how straight your arms are after each shot and make adjustments if needed. A good finish indicates many of the things that happened during the swing but were too fast to see were done well.
Notice in the sequence of pictures below, how clearly you can see the line on the ground as marked by the dowel. You can also observe how the hips and the shaft are forwards through impact which makes it possible to take the divot on the target side of the golf ball thus making the Low Point after the ball.
The Driver
As we have seen, having the Low Point situated slightly before the golf ball can be beneficial for hitting the ball longer distances with the driver. However, in my experience, the average golfer doesn’t have a strong enough “picture” in mind of what they are trying to achieve at impact. Quite often the Low Point is not situated sufficiently forwards because the golfer thinks he needs to assist the ball up into the air rather than let the club do the work. This is when golfers start to hang back, rather than transferring their weight forwards, and flip the wrists through impact while their arms flex, thus leading to all kinds of problems. More often than not, these moves have the opposite effect than that which is desired on the location of the Low Point. I often ask golfers what they think impact should look like and I am frequently told that it should mirror setup as closely as possible, this is not the case unless you have pre-set yourself into impact alignments before you start the swing. If you are going to work on having the Low Point slightly before the ball with a driver and an upwards angle of attack, make sure you don’t do it at the detriment of your basic impact alignments. Please ensure you achieve mastery of your Low Point by transferring your weight forwards via the motion of the hips going forwards, the body extending with the belt level rising and making an effort to keep the arms straight while the head remains centred and your inclination to the ground remaining constant. Remember also there are many things you can do to increase driver distance and altering your low point may or may not be the best option for you.
A Caveat
If the Low Point number given by Trackman indicates all is well but you are still struggling with fat and thin shots, be aware the distance between the lead shoulder and the golf ball must match the distance between the lead shoulder and the club head during impact. When this is not the case the golf ball still cannot be struck well.